
As web applications evolve, so does the need for intuitive and fast search functionalities. Enter Typesense, an ultra-fast, typo-tolerant search engine. If you're familiar with Next.js and want to harness the power of Typesense, you're in the right place.
By the end of this guide, you'll integrate Typesense into your Next.js project using Docker-Compose, streamlining the entire setup process.
Let's dive in!
Prerequisites
- A basic understanding of Next.js.
- Docker and Docker-Compose installed on your machine.
- A Next.js project to integrate with (if you don't have one, create it using
npx create-next-app).
1. Setting Up Docker-Compose
Firstly, we need a docker-compose.yml file at the root of our Next.js project. This file will define and configure our app's services.
1version: '3.8'2services:3 web:4 build:5 context: .6 dockerfile: Dockerfile7 ports:8 - "3000:3000"9 depends_on:10 - typesense11 typesense:12 image: typesense/typesense:0.24.113 ports:14 - "8108:8108"15 command: "command: --data-dir /data --api-key=YourApiKeyHere"16 volumes:17 - typesense-data:/data1819volumes:20 typesense-data:
A quick breakdown:
- web: This is your Next.js app. You'll need a Dockerfile for this which we'll discuss shortly.
- typesense: This is the Typesense service using its official image.
2. Dockerfile for Next.js App
Create a Dockerfile in the root of your Next.js project:
1FROM node:1823WORKDIR /app4COPY package*.json ./5RUN npm install6COPY . .78CMD ["npm", "run", "dev"]
This is a simple Dockerfile that takes the Node.js image, sets the work directory, copies your app, installs the dependencies, and runs the development server.
3. Configuring Typesense in Next.js
Install the necessary package:
1npm i typesense react-instantsearch-dom typesense-instantsearch-adapter
Now, in your Next.js application, initialize the Typesense client in a typesense.js file:
1import TypesenseInstantSearchAdapter from "typesense-instantsearch-adapter";23const typesenseInstantsearchAdapter = new TypesenseInstantSearchAdapter({4 server: {5 apiKey: 'YourApiKeyHere', // Use the same you've defined in docker-compose6 nodes: [7 {8 host: 'localhost',9 port: '8108',10 protocol: 'http',11 },12 ],13 },14 additionalSearchParameters: {15 query_by: "title",16 },17});1819export default typesenseInstantsearchAdapter;
Make sure you replace ‘YourApiKeyHere' with the API key defined in your docker-compose file.
4. Running Your Services
With everything in place, navigate to your project root and run:
docker compose up
Both your Next.js app and Typesense service should now be up and running!

5. Populating Data in Your Typesense Container
Now that you have Typesense running, it would be great to have some data inside to play around with. In this step, we'll populate your Typesense instance with sample data.
Create a Script File
Create a file inside the utils folder of your Next.js project named initializeTypesense.js.
Add the Typesense Client and Data
Inside initializeTypesense.js, you'll first initialize the Typesense client, then define and run functions to populate data:
1const Typesense = require('typesense');23const client = new Typesense.Client({4 nodes: [5 {6 host: 'localhost',7 port: '8108',8 protocol: 'http',9 }10 ],11 apiKey: 'YourApiKeyHere',12 connectionTimeoutSeconds: 213});1415async function createCollection() {16 const collectionSchema = {17 name: "posts",18 fields: [19 { name: "title", type: "string" },20 { name: "description", type: "string" },21 { name: "author", type: "string" },22 { name: "tags", type: "string[]", optional: true},23 { name: "published_date", type: "int32" }24 ],25 default_sorting_field: "published_date"26 };2728 return await client.collections().create(collectionSchema);29}3031async function insertData() {32 const samplePost = {33 id: "1",34 title: "Integrating Typesense with Next.js",35 description: "A deep dive into integrating Typesense search engine with Next.js using Docker.",36 author: "John Doe",37 tags: ["Typesense", "Next.js", "Docker"],38 published_date: Math.floor(new Date("2023-08-24").getTime() / 1000) // Convert to Unix timestamp. In Typesense, only integer or float fields can be used as sorting fields.39 };4041 return await client.collections("posts").documents().create(samplePost);42}4344async function main() {45 await createCollection();46 await insertData();47 console.log("Typesense data initialization complete!");48}4950main();
This code is quite simple. We initialize Typesense, create a Collection called “posts” and the populate this Collection with a post.
Execute the Script
Before you run the script, make sure your docker-compose services (especially Typesense) are up and running.
To execute the script, run:
1// Depending of your path2node utils/initializeTypesense.js
You should see:
1Typesense data initialization complete!
Things to Note
- Environment Configuration: In a real-world scenario, you might want to move configuration details, like the Typesense API key, to environment variables for better security and flexibility.
- Error Handling: The above script is a basic setup and does not handle possible errors (like trying to create a collection that already exists). Depending on your needs, you might want to add error handling or checks to make the script more robust.
- Script Execution: Since this is a one-time setup script, it's run manually from the command line. If you ever needed similar functionality in your app, you'd typically integrate such actions in response to specific user actions or events.
6. Using Typesense in your Components
With data in your Typesense collection, you can integrate search functionality into your Next.js components.
Create a BlogSearchComponent.jsx file:
1import React from 'react';2import {3 InstantSearch,4 SearchBox,5 Hits,6 RefinementList,7 Stats,8 SortBy9} from 'react-instantsearch-dom';10import typesenseInstantsearchAdapter from 'utils/typesense'; // adjust the path based on your directory structure1112const BlogHitComponent = ({ hit }) => {13 return (14 <div>15 <h3>{hit.title}</h3>16 <p>{hit.description}</p>17 <a href={`/blog/${hit.id}`}>Read More</a>18 </div>19 );20};2122const BlogSearchComponent = () => {23 const postCollection = `posts`;2425 return (26 <InstantSearch indexName={postCollection} searchClient={typesenseInstantsearchAdapter.searchClient}>27 <div style={{ padding: '2%' }}>28 <SearchBox />29 <Stats />30 </div>3132 <div className='flex'>33 <main style={{ display: 'flex', flexDirection: 'column', gap: '1rem' }}>34 <div style={{ padding: '2%' }}>35 <RefinementList attribute='tags' />36 <SortBy37 defaultRefinement={postCollection}38 items={[39 { value: postCollection, label: 'Latest' },40 { value: `${postCollection}_title_asc`, label: 'Title A-Z' },41 { value: `${postCollection}_title_desc`, label: 'Title Z-A' },42 ]}43 />44 </div>45 <Hits hitComponent={BlogHitComponent} />46 </main>47 </div>48 </InstantSearch>49 );50};5152export default BlogSearchComponent;
This component does the following:
- Allows users to search blog entries.
- Displays a list of blog entries (title, description, and a link to the full post).
- Lets users refine search results based on tags.
- Offers sorting options (by latest, title A-Z, and title Z-A).
For the blog entries to be displayed correctly:
- Ensure the posts collection in Typesense has fields like
id,title,description, andtags. - Adjust the path for the
typesenseInstantsearchAdapterimport based on your directory structure. - Implement routing for individual blog posts by creating dynamic routes. For example, create a /blog/[id].js file structure for individual blog post pages.
After creating the component, you can then use it in your desired page to display your posts collection with search capabilities.
7. Let's Search something!
Head over to localhost:3000 and give the search input a try. Every keystroke initiates an API call to the Typesense container, fetching results at blazing-fast speeds.
Within moments, you'll see the responsive search results appear!
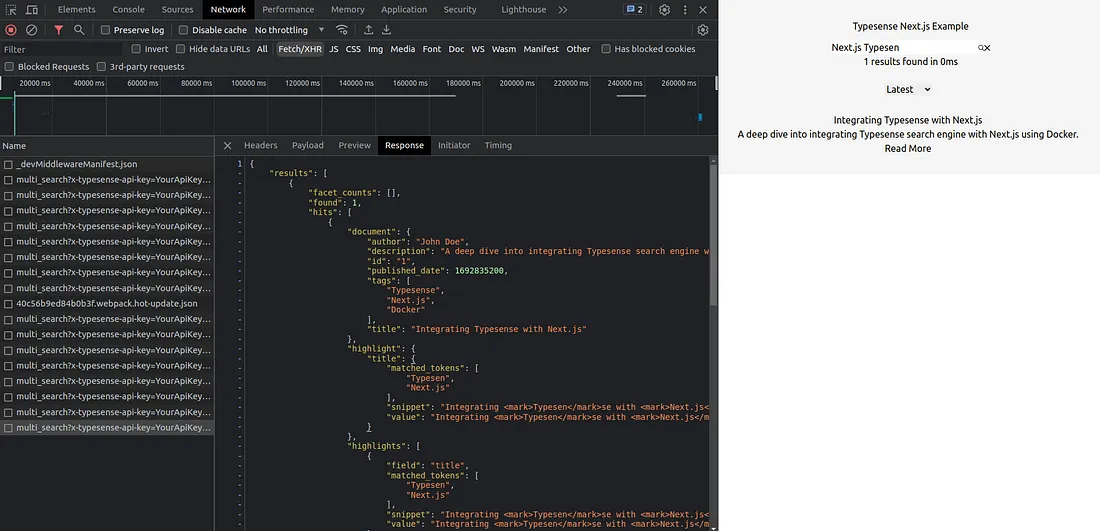
In our proof-of-concept, we've added only a single entry, but envision the potential when scaled to thousands of products for an e-commerce platform or countless posts on a blog.
The possibilities are vast!
If you encounter any issues while following this tutorial, please don't hesitate to contact me. I'll do my best to assist you and help find a solution!