
In this tutorial, I'll guide you through the process of creating a simple smart contract using Solidity, deploying it, and interacting with it using a Next.js project. Let's dive right in!
Prerequisites
- Node.js and npm installed on your system
- Basic knowledge of JavaScript and React
- Familiarity with the concept of blockchain and smart contracts
Step 1: Setting up the Next.js project
First, let's create a new Next.js project:
1npx create-next-app my-web3-app2cd my-web3-app
Step 2: Installing required dependencies
Install the required dependencies for working with Solidity and Ethereum:
1npm install ethers hardhat @nomiclabs/hardhat-waffle ethereum-waffle chai @nomiclabs/hardhat-ethers
Initialize Hardhat in your project:
1npx hardhat
Choose “Create an empty hardhat.config.js” and press Enter.
Then, open hardhat.config.js and configure it as follows:
1require("@nomiclabs/hardhat-waffle");23module.exports = {4 solidity: "0.8.18",5};
Step 3: Writing a basic Solidity smart contract
Create a new folder named contracts and create a file named Counter.sol inside it. Add the following code:
1// SPDX-License-Identifier: MIT2pragma solidity ^0.8.18;34contract Counter {5 uint256 private count;67 constructor() {8 count = 0;9 }1011 function increment() public {12 count += 1;13 }1415 function getCount() public view returns (uint256) {16 return count;17 }18}
This simple smart contract has a counter that can be increased by calling the increment() function.
Step 4: Compiling the Smart Contract
Compile your smart contract using the following command:
1npx hardhat compile
This will create a artifacts folder with the compiled contract files, including the JSON files containing the ABI.
Locate the JSON file with the ABI for the Counter contract in the artifacts/contracts folder. The file should be named Counter.json.
Copy the Counter.json file to the contracts folder.
Step 5: Deploying the Smart Contract
Create a scripts folder and a file named deploy.js inside it. Add the following code:
1async function main() {2 const Counter = await ethers.getContractFactory("Counter");3 const counter = await Counter.deploy();4 console.log("Contract deployed to:", counter.address);5}67main()8 .then(() => process.exit(0))9 .catch((error) => {10 console.error(error);11 process.exit(1);12 });
Now, start a local Ethereum network:
1npx hardhat node
And, in another terminal, deploy the contract:
1npx hardhat run scripts/deploy.js --network localhost
You should have the address of your deployed Smart Contract in the terminal.
Be aware that these accounts, and their private keys, are publicly known.
Step 6: Connect the Next.js app to the deployed smart contract
Create a file named ethereum.js in the root folder of the project and add the following code:
1import { ethers } from "ethers";23const localProvider = new ethers.providers.JsonRpcProvider(4 "http://localhost:8545"5);67export const getProvider = () => {8 return localProvider;9};1011export const getSigner = (index = 0) => {12 const provider = getProvider();13 const signer = provider.getSigner(index);14 return signer;15};1617export const getContract = (address, abi, signerIndex) => {18 const signer = getSigner(signerIndex);19 const contract = new ethers.Contract(address, abi, signer);20 return contract;21};
Step 7: Interact with the smart contract in your Next.js app
In the pages folder, open the index.js file and modify it to interact with the deployed smart contract:
1import { useEffect, useState } from "react";2import { getContract } from "../ethereum";3import Counter from "../contracts/Counter.json";45export default function Home() {6 const [count, setCount] = useState(0);7 const [contract, setContract] = useState(null);89 useEffect(() => {10 async function initContract() {11 const contract = getContract(12 "YOUR_CONTRACT_ADDRESS",13 Counter.abi,14 0 // Use the first account as the signer15 );16 setContract(contract);17 const initialCount = await contract.getCount();18 setCount(initialCount.toNumber());19 }20 initContract();21 }, []);2223 async function increment() {24 if (!contract) return;25 const tx = await contract.increment();26 await tx.wait();27 const updatedCount = await contract.getCount();28 setCount(updatedCount.toNumber());29 }3031 return (32 <div style={{ textAlign: 'center'}}>33 <h1>Counter: {count}</h1>34 <button onClick={increment}>Increment</button>35 </div>36 );37}
Replace "YOUR_CONTRACT_ADDRESS" with the address of your deployed contract.
Now you can run the Next.js app:
1npm run dev
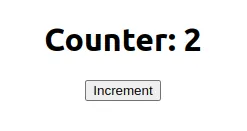
Navigate to http://localhost:3000 in your browser, and you should see the Counter app. Click the "Increment" button, and the counter will increase.
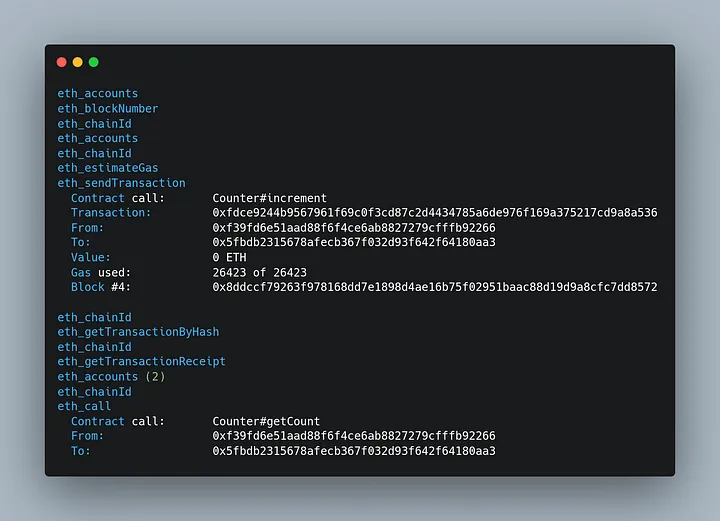
And each time you use the “Increment” button, you will see transactions logged:
Congratulations! You have just created a simple Next.js app that interacts with a Solidity smart contract. This is just the beginning of your journey into the world of blockchain development. As you explore further, you'll discover countless possibilities for creating innovative and decentralized solutions using these powerful technologies.
And fell free to contact me if you have any problems with this tutorial.