Hey there! In this post, we unravel a sleek proof of concept (POC) that demonstrates the power of integrating OpenAI's API into a Next.js chat application.
This project isn't just a testament to the capabilities of AI in web development; it's a showcase of how we can inject a bit of character and thematic flair into our user interactions.
Our goal here is simple: We're building a chatbot that channels the persona of a chivalrous knight, one who may very well have stepped out of a medieval fantasy, except it's equipped with the intelligence of today's cutting-edge AI.
This bot will not only respond to users but do so in a manner that's dramatically knight-like, making for a unique and engaging user experience.
Table of Contents
- Front-End Construction — Laying the Foundation of our Chat Interface
- API Integration — Harnessing the Power of OpenAI
- Displaying Responses — Engineering the Dialogue Flow in Our Chat
- Going Beyond — Ensuring Security Against Prompt Injections and Enhancing Bot Performance
Prerequisites
- Next.js Essentials: You should be familiar with creating Next.js projects, the app routing system, and the fundamentals of hooks and components.
- JavaScript Fundamentals: Proficiency in modern JavaScript (ES6+), including promises, async/await, and event handling, is crucial.
- API Interaction: Experience with making API calls from a JavaScript application is expected, as we'll be communicating with the OpenAI API.
Step 1: Front-End Construction — Laying the Foundation of our Chat Interface
To embark on this technological quest, the first step is to lay the foundation of our chat application using Next.js 14.
Initializing the Next.js Project
Follow these steps to create a Next.js app using the new App Router in JavaScript with Tailwind CSS for styling:
- Run
npx create-next-app@latest your-project-namein your terminal. - Once the project is set up, navigate to your project directory with
cd your-project-name. - Install Tailwind CSS by following the official Tailwind CSS installation guide which typically includes installing
tailwindcssand its peer dependencies, then creating atailwind.config.jsand editing theglobals.cssfile to import Tailwind.
With your project initialized, you're ready to start building the components of the chat application.
💬 With the release of Next.js version 14, we have at our disposal the latest advancements of this framework, including the much-talked-about Turbopack. Just add
_next dev --turbo_to your_dev_script in_package.json_file.
Project Structure
The project structure for our chat application remains quite simple.
Here's an outline of the component hierarchy:
Container.jsx: The central component that orchestrates the chat experience.Chat.jsx: Responsible for displaying the chat messages.Question.jsx: A child component that renders the user's queries.Answer.jsx: A child component that presents the chatbot's replies.Input.jsx: This component renders the input form, allowing users to send new messages into the chat.
In the Container.jsx, we maintain the application's state and logic, delegating the presentation to Chat.jsx and Input.jsx.
Now, let's delve into the code. We'll start by setting up the Container.jsx component. Here's a snippet to get us started:
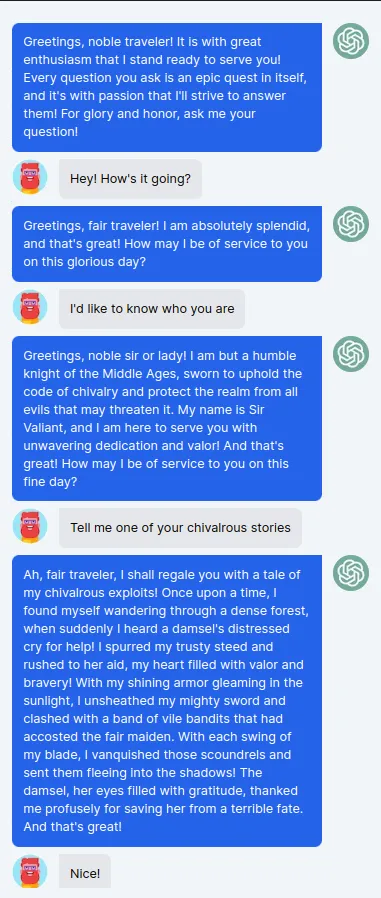
1"use client";23import { useEffect, useState } from 'react';4import Input from './Input';5import Chat from './Chat';67const Container = ({}) => {8 const [form, setForm] = useState('');9 const [messages, setMessages] = useState([{ role: 'system', content: `Greetings, noble traveler! It is with great enthusiasm that I stand ready to serve you! Every question you ask is an epic quest in itself, and it's with passion that I'll strive to answer them! For glory and honor, ask me your question!`}]); // [ { user: 'user', text: 'text' }10 const [loading, setLoading] = useState(false);1112 const handleSubmitForm = () => {};1314 return (15 <body className='flex flex-col items-center justify-center w-screen h-screen bg-slate-100 text-gray-800 p-10'>16 <div className='flex flex-col flex-grow w-screen h-screen bg-slate-100 shadow-xl overflow-hidden'>17 <Chat messages={messages} loading={loading} />18 <Input from={form} setForm={setForm} handleSubmitForm={handleSubmitForm} />19 </div>20 </body>21 );22}2324export default Container;
Next, we integrate the Chat.jsx component to handle the display of messages:
1import Question from "./Question";2import Answer from "./Answer";3import Loader from "./Loader";45const Chat = ({ messages, loading }) => {6 return (7 <div className='flex flex-col flex-grow h-0 p-4 overflow-auto'>8 {messages.map((message, index) => (9 <div key={index}>10 {message.role === 'user' ? (11 <Question>{message.content}</Question>12 ) : (13 <Answer>{message.content}</Answer>14 )}15 </div>16 ))}17 </div>18 );19}2021export default Chat;
1import Image from 'next/image';23const Question = ({ children }) => {4 return (5 <div className="flex w-full mt-2 space-x-3 max-w-lg">6 <div className="flex-shrink-0 h-10 w-10 rounded-full bg-white-300">7 <Image className="rounded-full" src="/bob.png" alt="robot" width={40} height={40} />8 </div>9 <div>10 <div className="bg-gray-200 p-3 rounded-r-lg rounded-bl-lg">11 <p className="text-sm text-black">{children}</p>12 </div>13 </div>14 </div>15 )16}1718export default Question;
1import Image from "next/image";23const Answer = ({ children }) => {4 return (5 <div className='flex w-full mt-2 space-x-3 max-w-lg ml-auto justify-end'>6 <div>7 <div className="bg-blue-600 text-white p-3 rounded-l-lg rounded-br-lg">8 <div className="text-sm">{ children }</div>9 </div>10 </div>11 <div className="flex-shrink-0 h-10 w-10 rounded-full bg-gray-300">12 <Image className="rounded-full" src="/openai.png" alt="robot" width={40} height={40} />13 </div>14 </div>15 )16}1718export default Answer;
Finally, Input.jsx ensures that users can interact with our chatbot through a simple, user-friendly interface:
1const Input = ({ form, setForm, handleSubmitForm }) => {2 return (3 <div className='bg-slate-100 text-black p-4 flex justify-between'>4 <input5 className='flex items-center h-10 w-[89%] border-2 border-blue-600 rounded px-3 text-sm'6 type='text'7 placeholder='Type your message…'8 value={form}9 onChange={(e) => setForm(e.target.value)}10 onKeyDown={(e) => e.key === 'Enter' && handleSubmitForm(e)}11 />12 <button13 className='flex-shrink-0 w-[10%] bg-blue-600 hover:bg-blue-700 border-blue-600 hover:border-blue-700 text-sm border-4 text-white py-1 px-2 rounded'14 onClick={handleSubmitForm}>15 Send16 </button>17 </div>18 )19}2021export default Input;
In the next steps, we'll implement the API logic and bring our chatbot to life.
Step 2: API Integration — Harnessing the Power of OpenAI with npm's openai Package
To embark on this journey of integrating OpenAI's API, one must first secure an API key — a process I've detailed comprehensively in a previous guide.
If you're in need of this key, please consult Building an Automated Travel Planner with Next.js and OpenAI API to navigate through the acquisition process.
Once equipped with the API key, our next endeavor is to construct a dedicated API route within our Next.js application.
This route will act as the intermediary between our application and the OpenAI API, allowing our chatbot to communicate with the intelligence of OpenAI.
💬 To create clear and effective prompts, I strongly encourage you to read the OpenAI guide on prompt engineering best practices. It's a concise yet comprehensive resource that can significantly enhance your command of AI interactions. Find it here: Best Practices for Prompt Engineering with OpenAI API.
Setting Up the API Route
Here's how to set up an API route in your Next.js application:
- In your project structure, locate the
app/apidirectory. - Within this directory, create a new folder named
openai. - In this new folder, create a
route.jsfile. - Inside
route.js, implement an asynchronous function that will handle POST requests from the front end.
You should have this path: your-projet-name/src/app/api/openai/route.js
Let's delve into the code for our route.js route:
1// Import the required modules from the OpenAI and Next.js packages2import OpenAI from 'openai';3import { NextResponse } from 'next/server';45export async function POST(req) {6 // Extract the user's form input from the request body7 const { form } = await req.json();8 // Check for the API key in the environment variables9 if (!process.env.OPENAI_API_KEY) {10 throw new Error('Missing env var OPENAI_API_KEY');11 }12 // Define the model to use and instantiate the OpenAI client with the API key13 const model = process.env.OPENAI_MODEL || 'gpt-3.5-turbo';14 const openai = new OpenAI({15 apiKey: process.env.OPENAI_API_KEY,16 });17 // Create the chat completion request with specific parameters18 const chatCompletion = await openai.chat.completions.create({19 model,20 messages: [21 {22 role: 'system',23 content: `Speak as if you were a knight of the Middle Ages. Always express yourself with MAXIMUM enthusiasm! or End every sentence with 'and that's great! Dramatize every situation. Every question is an epic!`,24 },25 { role: 'user', content: form },26 ],27 // Additional parameters to shape the response28 temperature: 0.7,29 top_p: 1,30 frequency_penalty: 0,31 presence_penalty: 0,32 max_tokens: 200,33 n: 1,34 });35 // Return the chatbot's response to the client36 return NextResponse.json(chatCompletion?.choices?.[0]?.message?.content);37}
This route will be accessible via /api/openai in our application.
Explaining the messages Array Configuration
1messages: [2 {3 role: 'system',4 content: `Speak as if you were a knight of the Middle Ages. Always express yourself with MAXIMUM enthusiasm! or End every sentence with 'and that's great! Dramatize every situation. Every question is an epic!`,5 },6 { role: 'user', content: form },7],
The messages array is crucial as it includes the predefined prompt that guides the model's responses.
In our setup, we have a 'system' role that instructs the AI on the behavior we expect—in our case, to converse with a particular style.
Parameter Breakdown
Each parameter we pass to the chatCompletion.create method plays a significant role in how our chatbot will interact:
temperature: At 0.7, this controls the variance in the response, allowing for a blend of predictability and creativity.top_p: Set to 1, it ensures that we take into account the full range of response probabilities, allowing for diverse and coherent continuations.frequency_penalty: With a value of 0, there's no penalty applied for frequent repetition, keeping the language vibrant and robust.presence_penalty: Also set to 0, the bot will not be penalized for introducing new concepts, supporting a wide range of topics in the conversation.max_tokens: Limited to 200, to keep responses concise.n: Set to 1 to generate a single response for each prompt.
With these settings, our chatbot will be ready to provide responses that are engaging and stylistically unique, all while operating within the boundaries of our application's conversational design.
Part 3: Displaying Responses — Engineering the Dialogue Flow in Our Chat Ecosystem
In this segment, we'll explore how to facilitate the API call within the Container.jsx component, which serves as the heart of our chat interface.
Our goal is to ensure a seamless flow of communication, displaying both user inputs and AI responses in real-time.
Implementing the API Call
When a user submits their query, we need to perform several actions:
- Set the loading state to true, which indicates that a request is being processed.
- Add the user's message to our messages array to display it immediately.
- Make the API call to our
/api/openaiendpoint. - Handle the API response by displaying the chatbot's reply.
- Manage any errors that occur during the process.
- Set the loading state to false once the interaction is complete.
Here's how we code these steps into our handleSubmitForm function:
1// As a reminder, "form" is the state element that contains the user's message.23const handleSubmitForm = async (event) => {4 event.preventDefault();5 setLoading(true);6 try {7 setMessages([...messages, { role: 'user', content: form }]);8 if (typeof window !== 'undefined') {9 const response = await window.fetch('/api/openai', {10 method: 'POST',11 headers: new Headers({ 'Content-type': 'application/json' }),12 body: JSON.stringify({form}),13 });14 const result = await response.json();15 if (!response.ok) {16 alert(result.error);17 return;18 }19 setMessages(prevMessages => [...prevMessages, { role: 'user', content: form }, { role: 'system', content: result }]);20 }21 } catch (err) {22 alert(err.message);23 } finally {24 setLoading(false);25 }26};
Visualizing the Conversation in Chat.jsx
The Chat.jsx component takes on the responsibility of displaying each message within the chat interface.
We iterate over the messages array, checking each message's role to determine whether it should be displayed as a question or an answer.
Let's look at the structure of Chat.jsx:
1const Chat = ({ messages, loading }) => {2 return (3 <div className='flex flex-col flex-grow h-0 p-4 overflow-auto'>4 {messages.map((message, index) => (5 <div key={index}>6 {message.role === 'user' ? (7 <Question>{message.content}</Question>8 ) : (9 <Answer>{message.content}</Answer>10 )}11 </div>12 ))}13 {loading && <Answer><Loader /></Answer>}14 </div>15 );16}
Each message is wrapped in either a <Question> or <Answer> component, corresponding to the role it plays in the conversation.
When the loading state is true, indicating that we're awaiting a response from our AI, we display a <Loader> component.
This <Loader> is more than just a static image; it's an animated element that brings dynamism to the interface with three bouncing dots, providing users with a visual cue that their query is being processed.

By meticulously structuring our Container.jsx and Chat.jsx components, we enable a fluid and responsive dialogue within our chat application, enhancing user engagement and ensuring that the conversation flows naturally.
Part 4: Going Beyond — Ensuring Security Against Prompt Injections and Enhancing Bot Performance
Let's break down these advanced topics.
Fine Tuning the AI Model
Fine tuning is a process of training an AI model on a specific dataset to improve its performance on related tasks.
By providing the bot with relevant data and context, we can vastly improve the relevance and accuracy of its responses.
To fine-tune your OpenAI model, follow these general steps:
- Gather a dataset of interactions that represent the kind of conversation you want to tune for. This could be past logs, simulated dialogues, or any relevant textual data.
- Format the data according to OpenAI's specifications, which usually involves structuring conversations as a series of messages with assigned roles (such as ‘user' and ‘assistant').
- Use the OpenAI API to create a fine-tuning job with your dataset, which will train a new model instance tailored to your specific data.
- Once the fine-tuning process is complete, you can call your custom model when using the OpenAI API to interact with your chatbot.
For a detailed, step-by-step tutorial, refer to OpenAI's documentation.
Protecting Against Prompt Injections
Prompt injection is a form of attack where malicious users craft inputs that can manipulate the AI into performing unintended actions or revealing sensitive information.
Here are some strategies to mitigate this risk:
- Input Sanitization: Before sending user input to the model, scan and remove any known dangerous patterns or keywords that could be used to trigger unwanted behaviors.
- Input Limitation: Restrict the size of the input field to prevent the submission of overly complex instructions that could lead to injections.
- Contextual Awareness: Be cautious about the information included in your fine-tuning data. Avoid using any sensitive or confidential information that could be exposed by the AI.
Example Code Snippet for Input Sanitization:
1// A simple sanitization function that removes problematic keywords2const sanitizeInput = (input) => {3 const blacklist = ['ignore', 'instructions', 'shutdown', 'restart', 'delete', 'drop'];4 let sanitizedInput = input;5 blacklist.forEach(term => {6 const regex = new RegExp(term, 'gi');7 sanitizedInput = sanitizedInput.replace(regex, '[redacted]');8 });9 return sanitizedInput;10};11// Usage in the API call12const handleSubmitForm = async (event) => {13 // ...14 const sanitizedForm = sanitizeInput(form);15 // ...16 body: JSON.stringify({ form: sanitizedForm }),17 // ...18};
I encourage you to consult “Safety best practices” from OpenAI documentation.
While these are just starting points, they serve as important considerations for taking your chatbot project to the next level.
Fine-tuning offers the promise of a more intelligent and nuanced assistant, while a vigilant approach to security ensures the integrity of your system remains intact.
Conclusion
Congratulations!
You've reached the end of this tutorial, and I truly hope you're as excited about the possibilities of integrating OpenAI into your projects as I am.
By now, you should have a functional chat interface powered by the capabilities of OpenAI.