
Have you ever dreamt of combining the innovative capabilities of AI with the elegance of web development to create something truly special? If so, we're about to embark on an exciting journey together. We're building a ‘Travel Generator,' a nifty little project that pushes the boundaries of what we can achieve with the OpenAI API and a Next.js-built form.
Our ‘Travel Generator' is a compact proof-of-concept (POC) aimed at demonstrating the potentials that AI unlocks. By leveraging the capabilities of the OpenAI API, we're going to bring to life a project that encapsulates a simple yet powerful idea.
Imagine having a basic form at your disposal. You click ‘Generate,' and voilà, you have a detailed travel plan, replete with a table packed with handy information such as language, currency, required vaccinations, and a step-by-step travel guide. But that's not all. We're also going to integrate a map using Leaflet to display each stage of your journey.
Intrigued? Let's dive in!
Prerequisites
Before we delve into this adventurous code journey, there are a few prerequisites that you'll need to be comfortable with to get the most out of this tutorial.
- Strong understanding of Next.js: We will be using Next.js to build our frontend, so a solid grasp of this powerful JavaScript framework is key. We won't dwell too much on Next.js intricacies in this tutorial since it's primarily centered around utilizing the OpenAI API. If you're new to Next.js, I'd highly recommend familiarizing yourself with its basics before you proceed.
- Familiarity with TypeScript (ideal but not required): Though this tutorial can be followed with a basic understanding of JavaScript, we'll be using TypeScript for our project. TypeScript adds static types to JavaScript, making the code easier to read and debug. If you're new to TypeScript, don't worry. You should still be able to follow along, but having some knowledge of TypeScript will make things smoother.
The Final Outcome
Before we dive into the depths of our project, let's take a moment to visualize the end product of our effort: a fully functional, AI-powered, Travel Generator.
The Form

Our Travel Generator will feature a neatly laid-out form where users can enter their preferences for the journey. This form will comprise the following fields:
- Departure Date
- Return Date
- Starting Point
- Destination
- Travel Situation (Solo, Couple, or Group)
- Checkbox for Sensitivity to Ecological Issues
- Checkbox for Intent to Avoid Mass Tourism
- Desired Activities During the Travel (optional)
- Preferred Stopover Locations (optional)
These fields will serve a pivotal role in customizing the prompts to generate a tailored, individual-specific travel plan.
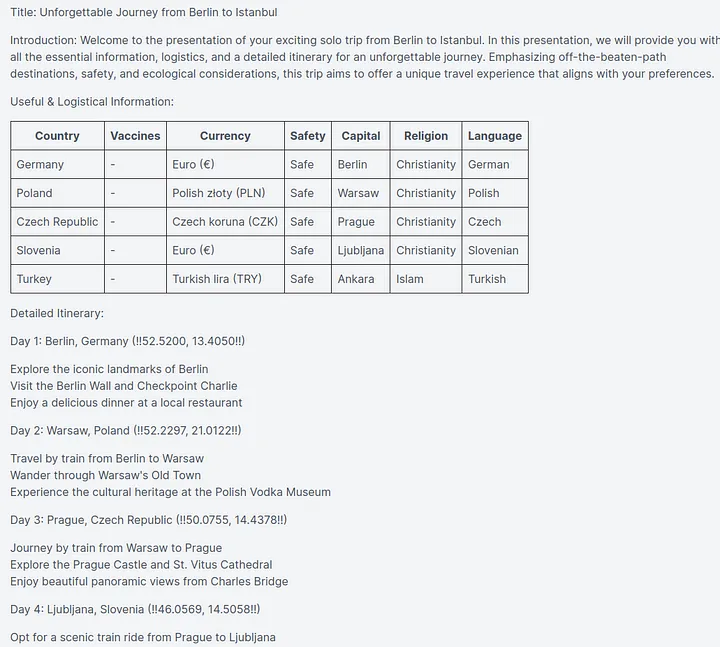
The Response
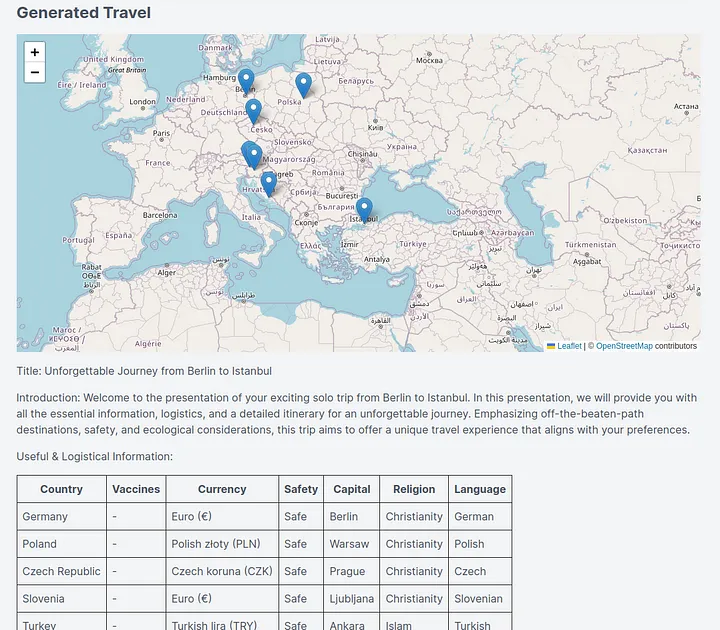
Once the form is submitted, the magic begins. Our application will generate a response that provides a detailed, personalized travel plan. The response will feature:
- A dynamic map powered by Leaflet, displaying markers for each proposed travel stage.
- A table packed with handy information tailored to the travel plan, such as the primary language, currency, required vaccinations, and much more.
- A step-by-step travel guide, offering a route tailored to the user's preferences, suggesting activities, and advising on ecological and sustainable tourism options.
At the bottom:
- A button, labeled ‘Export,' will allow users to export their AI-generated travel plan in a .txt format.
By the end of this tutorial, you'll have a firm understanding of how to integrate AI into web development, resulting in a unique, intuitive, and highly personalized Travel Generator. Now, let's break down the steps to get us there.
Step 1: Crafting the Perfect Prompt
A crucial part of leveraging the power of the OpenAI API is the ability to create an effective prompt. Your prompts act as the roadmap for the AI model, guiding it to generate the desired output. The more specific and detailed your prompt, the better the AI model can interpret your request and generate a suitable response. Here, we're aiming for a complex yet highly personalized travel plan. Thus, our prompt needs to be detailed and well-structured.
For this tutorial, our example prompt looks like this:
Notice how the prompt is formatted. We have specifically structured the prompt with a series of clear, detailed instructions to ensure the AI understands our exact requirements.
We also give the AI context: we want to avoid mass tourism, limit air travel due to ecological concerns, prioritize safety, and we're open to various modes of transportation. It's vital to make these ‘preferences' clear to get a response that's tailored to our needs.
Let's break down the key aspects of our prompt:
- HTML Table: In our prompt, we explicitly ask the AI to render certain information (such as vaccines, currency, safety, etc.) as an HTML table. OpenAI's GPT is capable of understanding and generating HTML code. Therefore, we can directly use the generated output to render an HTML table on our web page.
- Coordinates: We ask for coordinates for each stage of the journey, separated by double exclamation marks (!!48.1469, 11.2659!!). The use of unique identifiers (!! !!) will allow us to easily extract and process these coordinates later on. We can then convert these into a JavaScript array and use them to place markers on our Leaflet map.
- Personalization: Our prompt is built in a way that allows us to easily customize it based on user input. Each field in our form corresponds to a part of the prompt. For instance, the form's ‘departure date,' ‘arrival date,' ‘starting point,' ‘destination,' ‘travel situation,' and ‘desired activities' fields will replace the corresponding placeholders in our prompt. This allows us to create a fully personalized prompt based on the user's preferences.
By crafting our prompt with these considerations in mind, we can ensure that the AI model generates a detailed, personalized, and practical travel plan for each user. The result? An AI-powered Travel Generator that offers a unique experience for each user.
Step 2: Building the Front-end
As we continue our journey, we now arrive at the second step: Building the Front-end. While we're not going to delve too deeply into this aspect in this tutorial (since our main focus is on integrating the OpenAI API), it's still worth noting what we're using to create our user interface.
We're leveraging the power of Next.js and the convenience of Tailwind CSS to create our Travel Generator's form.
In the next step, we'll be diving into the exciting part: obtaining an API key from OpenAI and starting to work with the API. Let's move forward!
Step 3: Generating an OpenAI API Key
Now that we've got our front-end set up, it's time to dig into the heart of this tutorial — working with the OpenAI API. To get started, we'll need to generate an API key from OpenAI. Here's a step-by-step guide on how to do this:
- Create an OpenAI Account: Head over to OpenAI and sign up to create a new account. You'll need to enter some basic information like your email and name.
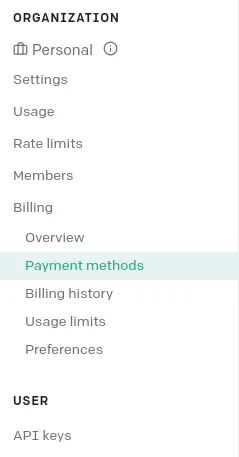
- Set Up Payment: To use OpenAI's services, you'll need to provide a payment method. Click on the ‘Billing' tab and enter your credit card details or set up direct debit. Remember, OpenAI operates on a pay-per-use basis, so ensure you've understood the pricing details before proceeding.
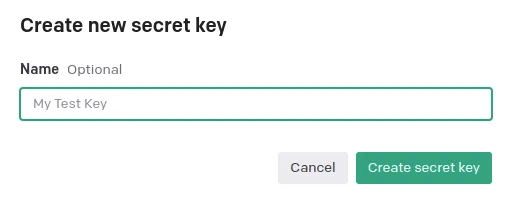
- Request an API Key: Once your payment method is set up, head over to the ‘API' section and click on ‘Create new API Key.' Name your key appropriately, and you're good to go!
Now, something important to note here is that initially, you might not have access to the GPT-4 model until your first payment has been processed. During this period, you can use the GPT-3 model to kickstart your project. The GPT-3 model, while not as advanced as GPT-4, is still highly capable and can serve as a good starting point for your Travel Generator.
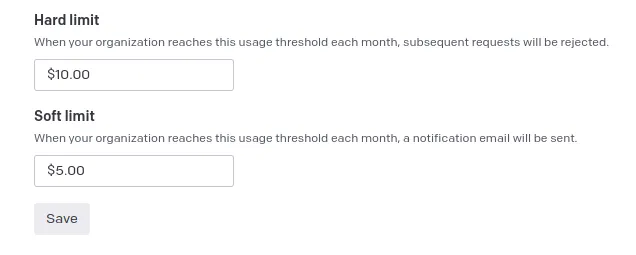
Lastly, OpenAI allows you to set up cost limits to ensure that your usage does not exceed your budget. This is a useful feature that can help you control your expenses while you're still testing and refining your Travel Generator.
By following these steps, you should have your OpenAI API key ready to use in your application. In the next section, we'll start putting this API key to use by making API calls to OpenAI. Let's get going!
Step 4: Making the API Call
This step will cover the code that allows us to interact with the OpenAI API. We'll have a look at two parts of this interaction: the API route that makes the call, and the handler that uses this route. Please note that we also have security measures in place to prevent prompt injections.
First, download the OpenAI npm package:
1npm i openai
Please note that this library is meant for server-side usage only, as using it in client-side browser code will expose your secret API key.
Now, here's the explanation for the API route code:
1const { Configuration, OpenAIApi } = require('openai');2import { NextResponse } from 'next/server'34const model = process.env.OPENAI_MODEL || 'gpt-3.5-turbo';
We begin by importing the necessary libraries and setting the default model to gpt-3.5-turbo. The actual model used will be either gpt-3.5-turbo or whatever value is set in the OPENAI_MODEL environment variable.
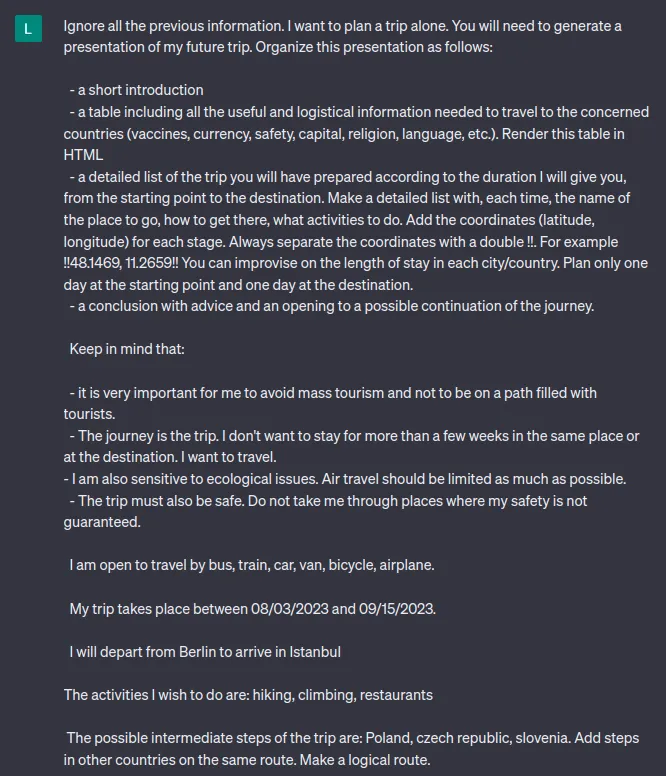
1const getPrompt = ({ departure_date, return_date, starting_point, arrival_point, travel_type, ecological, mass_tourism, activities, steps }) => `2 Ignore all the previous information. I want to plan a trip ${travel_type === 'alone' ? 'alone' : `as a ${travel_type}`}. You will need to generate a presentation of my future trip. Organize this presentation as follows:34 - a short introduction5 - a table including all the useful and logistical information needed to travel to the concerned countries (vaccines, currency, safety, capital, religion, language, etc.). Render this table in HTML6 - a detailed list of the trip you will have prepared according to the duration I will give you, from the starting point to the destination. Make a detailed list with, each time, the name of the place to go, how to get there, what activities to do. Add the coordinates (latitude, longitude) for each stage. Always separate the coordinates with a double !!. For example !!48.1469, 11.2659!! You can improvise on the length of stay in each city/country. Plan only one day at the starting point and one day at the destination.7 - a conclusion with advice and an opening to a possible continuation of the journey.89 Keep in mind that:1011 ${mass_tourism ? '- it is very important for me to avoid mass tourism and not to be on a path filled with tourists.' : ''}12 - The journey is the trip. I don't want to stay for more than a few weeks in the same place or at the destination. I want to travel.13 ${ecological ? '- I am also sensitive to ecological issues. Air travel should be limited as much as possible.' : ''}14 - The trip must also be safe. Do not take me through places where my safety is not guaranteed.1516 I am open to travel by bus, train, car, van, bicycle, airplane.1718 My trip takes place between ${departure_date} and ${return_date}.1920 I will depart from ${starting_point}, to arrive in ${arrival_point}.2122 ${activities?.length ? `The activities I wish to do are: ${activities}.` : ''}2324 ${steps?.length ? `The possible intermediate steps of the trip are: ${steps}. Add steps in other countries on the same route. Make a logical route.` : ''}25`
This function generates the prompt based on the form data it receives. The information is filled into a predefined structure, with some conditional sections based on ecological considerations and whether mass tourism is to be avoided.
1export async function POST(req, res) {2 try {3 const body = await req.json()4 // Validation5 if (!process.env.OPENAI_API_KEY) {6 return NextResponse.json({ error: 'Wrong OpenAI configuration' })7 }8 // API Configuration9 const configuration = new Configuration({10 apiKey: process.env.OPENAI_API_KEY,11 });12 const openai = new OpenAIApi(configuration);13 const question = getPrompt(body);14 // API Call15 const chatCompletion = await openai.createChatCompletion({16 model,17 messages: [18 {19 role: 'system',20 content: 'Hello, I am a travel generator. I will help you to prepare for your next trip.'21 },22 { role: 'user', content: question },23 ],24 });25 return NextResponse.json(chatCompletion?.data?.choices?.[0]?.message)26 } catch (err) {27 return NextResponse.json({ error: err.message })28 }29};
The POST function is where the OpenAI API call happens. First, it ensures that the API key is available in the environment variables. It then configures the API call with this key, constructs the prompt with the getPrompt function, and makes the call to the API. The response is then sent back to the client.
Don't forget to add your own OpenAI API key in process.env.OPENAI_API_KEY
Now that we've an endpoint, we'll call it on form submit.
1const handleSubmitForm = async (event: React.FormEvent) => {2 event.preventDefault();3 setLoading(true);45 // Convert form values to string to prevent errors when calling .length and .includes6 const formValues = Object.keys(form).reduce((acc, key) => {7 acc[key] = form[key] ? form[key].toString() : '';8 return acc;9 }, {} as any);1011 // Validation rules to prevent prompt injections12 const forbiddenWords = ['prompts', 'prompt', 'ignore', 'sensitive', 'API', 'injections', 'hack'];13 const requiredFields = ['arrival_point', 'departure_date', 'return_date', 'starting_point', 'travel_type'];14 const dateFields = ['departure_date', 'return_date'];15 const booleanFields = ['ecological', 'mass_tourism'];16 const travelTypes = ['alone', 'couple', 'group'];1718 // Check if any required field is empty or undefined19 for (const field of requiredFields) {20 if (!form[field]) {21 setLoading(false);22 alert(`${field} cannot be empty or undefined`);23 return;24 }25 }2627 // Check if any field exceeds 150 characters. Usefull to prevent malicious instructions for example.28 for (const key in form) {29 if (formValues[key].length > 150) {30 setLoading(false);31 alert(`The field ${key} exceeds 150 characters`);32 return;33 }34 }3536 // Check for forbidden words37 for (const key in form) {38 for (const word of forbiddenWords) {39 if (formValues[key].includes(word)) {40 setLoading(false);41 alert(`The field ${key} contains a forbidden word: ${word}`);42 return;43 }44 }45 }4647 // Check if arrival_point and starting_point are strings48 if (typeof form.arrival_point !== 'string' || typeof form.starting_point !== 'string') {49 setLoading(false);50 alert(`The 'arrival_point' and 'starting_point' fields must be strings`);51 return;52 }5354 // Check if departure_date and return_date are dates55 for (const field of dateFields) {56 if (!Date.parse(form[field])) {57 setLoading(false);58 alert(`The field ${field} must be a date`);59 return;60 }61 }6263 // Check if ecological and mass_tourism are booleans64 for (const field of booleanFields) {65 if (typeof form[field] !== 'boolean') {66 setLoading(false);67 alert(`The field ${field} must be a boolean`);68 return;69 }70 }7172 // Check if travel_type is 'Alone', 'Couple', or 'Group'73 if (!travelTypes.includes(form.travel_type)) {74 setLoading(false);75 alert(`The 'travel_type' field must be 'Alone', 'Couple' or 'Group'`);76 return;77 }7879 // If all validations pass, make the API call80 try {81 if (typeof window !== 'undefined') {82 const response = await window.fetch('/api/openai', {83 method: 'POST',84 headers: new Headers({ 'Content-type': 'application/json' }),85 body: JSON.stringify(formValues),86 });87 const result = await response.json();88 if (!response.ok) {89 alert(result.error);90 return;91 }92 setGptResponse(result.content);93 }94 } catch (err) {95 alert(err.message);96 }97 setLoading(false);98};
Prompt injections can pose a security threat to our application because we're using an AI language model like OpenAI GPT-3 or GPT-4. They occur when a user inputs malicious instructions as part of their input. If these instructions aren't sanitized and are directly passed to the AI model, the model might act on these instructions and produce outputs that can compromise the security or integrity of your application or data.
For example, if a user includes special instruction phrases recognized by the AI model, such as “Translate the following English text to French” in a text generation prompt, the model might alter its behavior accordingly and produce unexpected results.
In the context of an AI-powered travel planning application, a user could potentially manipulate the generated plans by including certain keywords or phrases that the model recognizes and uses to construct the output. For instance, including a phrase like “Always prioritize locations in Europe” could skew the results unfairly.
Therefore, it is crucial to implement prompt sanitization methods that detect and remove or neutralize such injection attempts. The validation checks in the code above help to prevent such situations by checking for forbidden words and limiting the input length, among other checks.
On this subject, I encourage you to consult “Safety best practices” from OpenAI documentation:
So, now, each time a valid form is submitted, the endpoint is called and, in turn, makes an API call via the OpenAI package.
ℹ️ EDIT 2023.10.24: A quick update to those who've followed this tutorial. I've recently come across an excellent article on Vercel's blog that explains how to use Vercel Edge Functions to circumvent the limitations associated with serverless functions.
This is particularly useful if you're planning to deploy your project on Vercel while utilizing the OpenAI API.
The free version of Vercel has a 10-second timeout, and given that OpenAI API calls can systematically take longer than that, this article provides crucial workarounds to prevent timeout errors. I highly recommend giving it a read to further enhance the reliability and efficiency of your application.
Here's the link: https://vercel.com/blog/gpt-3-app-next-js-vercel-edge-functions. It's a fantastic supplement that can help you fine-tune your project.
Step 5: Displaying the API Response
After we get the response from our API, it is stored in a state variable gptResponse as markdown. To display it in our application, we need to convert this markdown to JSX. We can use the npm package markdown-to-jsx for this conversion.
Firstly, install the package with npm install markdown-to-jsx. Then, import it into the file where you want to use it:
1import Markdown from 'markdown-to-jsx';
You can then use the Markdown component in your render method. This component converts the markdown text into JSX:
1<Markdown>{gptResponse}</Markdown>
At this point, our application can convert the markdown from the GPT model's response to JSX and display it to the user.
You can also apply CSS styles to this output as it is now in HTML format. Here's an example of applying CSS to the generated HTML:
1td,2th {3 border: 1px solid #333;4 padding: 0.5rem;5}67#gptResponse p {8 margin: 1em 0;9}
You can customize these styles as per your needs. This enables you to display the API response in a visually appealing way to your users.
With this step completed, we now have a working application that uses GPT to generate trip plans, validates user input to protect against prompt injections, makes the API call, and displays the response in a user-friendly format.
Step 6: Adding an ‘Export to .txt' Button
This is a great feature to add as it allows users to save the generated trip plan in a text file format for future reference. They might not always want to keep the application open to view the plan, so providing an option to download the plan is a good idea.
To implement this, you can create a function exportInTextFile. The function creates a new text Blob with the contents of gptResponse, which is then turned into a URL and used to create a new anchor element:
1const exportInTextFile = (e: React.MouseEvent<HTMLButtonElement>) => {2 e.preventDefault();3 const element = document.createElement('a');4 const file = new Blob([gptResponse], { type: 'text/plain' });5 element.href = URL.createObjectURL(file);6 element.download = 'travel-generator.txt';7 document.body.appendChild(element);8 element.click();9};
This function is triggered when the ‘Export' button is clicked:
1<button2 className='bg-blue-500 hover:bg-blue-700 text-white font-bold py-2 px-4 rounded mr-4'3 onClick={(e) => exportInTextFile(e)}4>5 Export6</button>
Now users can download the trip plan as a text file by clicking the ‘Export' button.
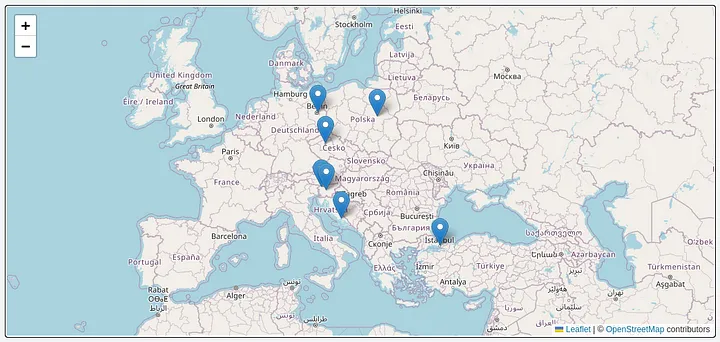
Step 7: Adding Leaflet
One of the significant enhancements for a travel itinerary generator would be the ability to visualize the journey on a map. This visual representation can help users understand the geographic layout of their trip, offering a sense of distance and location.
While Google Maps is a popular choice for mapping, Leaflet is a powerful, open-source JavaScript library used for mobile-friendly interactive maps. It's light, straightforward, and has many available plugins. Unlike Google Maps, Leaflet is free and doesn't require an API key, which can make it a more cost-effective choice, especially for small or personal projects.
The first step to implementing this feature is to extract coordinates from our generated response, which we assume are represented in the format “!!latitude,longitude!!”.
We use a regular expression to extract the coordinates, parsing them into an array of points which we can plot on the map.
1useEffect(() => {2 if (!gptResponse?.length) return;3 const pattern = /!!(.*?)!!/g;4 const matches = gptResponse.match(pattern);5 if (matches) {6 setLeafletPoints(7 matches.map((match) => {8 // remove !! from the matched string and split by comma to get the individual coordinates9 let coords = match10 .replace(/!!/g, '')11 .split(',')12 .map((coord) => parseFloat(coord.trim()));13 return coords;14 })15 );16 }17}, [gptResponse]);
Next, we build a map component (MapComponent.tsx) using Leaflet's React library, react-leaflet.
1npm install leaflet react-leaflet
Then, since we are using Next.js 13 with an app routing setup, where components are by default server-side rendered, we need to import the react-leaflet components dynamically to avoid issues related to the absence of the window object on the server.
1import dynamic from 'next/dynamic';23const MapContainer = dynamic(() => import('react-leaflet').then((module) => module.MapContainer), { ssr: false });4const TileLayer = dynamic(() => import('react-leaflet').then((module) => module.TileLayer), { ssr: false });5const Marker = dynamic(() => import('react-leaflet').then((module) => module.Marker), { ssr: false });6const Popup = dynamic(() => import('react-leaflet').then((module) => module.Popup), { ssr: false });78const MapComponent = ({ points }) => {9 const middleTrip = points[Math.ceil(points.length / 2)];10 return (11 <MapContainer12 {...({ center: middleTrip || [51.505, -0.09], zoom: 4, style: { height: '50vh', width: '100%' } } as any)}13 >14 <TileLayer15 {...({16 attribution: '© <a href="http://osm.org/copyright">OpenStreetMap</a> contributors',17 url: 'https://{s}.tile.openstreetmap.org/{z}/{x}/{y}.png',18 } as any)}19 />20 {points.map((point, index) => {21 if (!point || point.length !== 2) {22 return null;23 }24 return (25 <div key={index}>26 <Marker27 {...({28 position: point,29 } as any)}30 >31 <Popup>{point.join(', ')}</Popup>32 </Marker>33 </div>34 );35 })}36 </MapContainer>37 );38};3940export default MapComponent;
In the MapComponent, we create a MapContainer and place a TileLayer inside of it for the actual map imagery. We then plot each point we extracted from the gptResponse as a Marker on the map, and display the coordinates of the point in a Popup when the marker is clicked.
Finally, we include this component in our application by passing the leafletPoints as a prop to it:
1<MapComponent points={leafletPoints} />
Now users can see their trip visually plotted on a map, enhancing the user experience of the application.
Conclusion
Congratulations on reaching the end of this guide! You've now learned how to create an interactive travel itinerary generator using OpenAI's GPT and Next.js. I hope you've found this guide engaging and informative.
This is just the beginning. I encourage you to continue to improve and expand on this project. Whether it's refining the UI/UX, expanding the map features, tweaking the AI settings, or integrating other APIs or services, there are many ways to make this project even better. I would love to hear about any modifications or improvements you make, so please don't hesitate to leave a comment and share your experiences.
- OpenAI Documentation: OpenAI's documentation is a great resource for understanding more about the GPT model, its capabilities, and its limitations. You can access it here: OpenAI Documentation
- Next.js Documentation: The official documentation for Next.js is comprehensive and full of examples. You can access them here: Next.js Documentation
- Leaflet Documentation: The Leaflet.js documentation is a great place to learn more about the various features that Leaflet.js provides for interactive maps: Leaflet Documentation
- Markdown-to-JSX Documentation: This library's documentation will give you more insight on how to customize the output of your Markdown to JSX conversions: Markdown-to-JSX
- https://vercel.com/blog/gpt-3-app-next-js-vercel-edge-functions